Most of our projects are about upgrades to street cars. But, this is about a complete new build, from scratch, of a Porsche 997.2 Factory Cup Car (Factory 911 race car, the 997.2 version built from 2010 thru 2012, the 997.2 version being built on the “wide” body 911 body and with the 3.8L engine.? A factory race car is not a street car first, and then made into a race car, Porsche starts w a body in white, reinforces all seams, and adds the cage, then builds the complete car, with most parts being Motorsport parts, not street car parts). Porsche has been making full factory race cars for over 15 years, and has the most successful customer race program in the world. Porsche makes the Cup Car as a turn key program….just order, and you get a complete race car, even with some spares. Add fuel, and you’re ready to go.
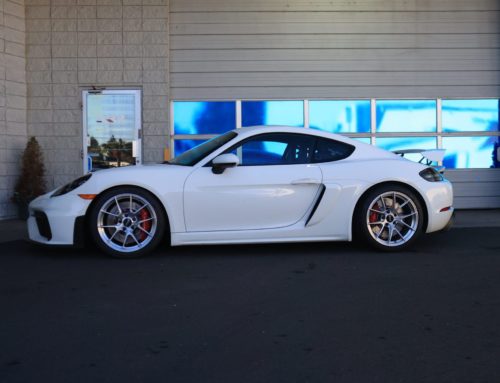
Here is what the car looked like the first time around…after the first build by BRracing –

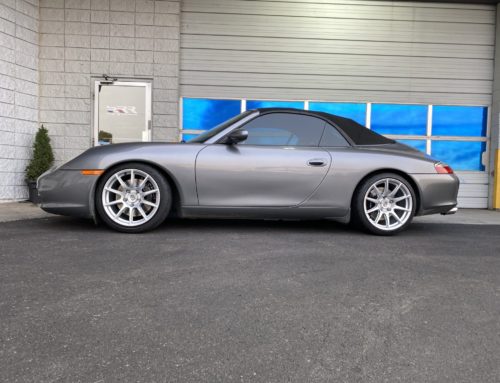
But, what if something goes wrong….and that car gets dented, bent, and the core factory frame is not usable. Then, if you supply the original Cup Car VIN to Porsche, you can order a new factory “TUB”, or body in white, and create a new car. That’s what this write up is all about…..the build of a new 997.2 Cup Car starting from a new TUB.
We will break up the build into the sections, so you can see the progress of the build in each area. We will also have “time lapse” videos of the build.
TUB delivery from Porsche (all tubs, new, come from Germany, air-freighted, in this case to San Francisco, then delivered by truck to our facility for the start of the project.
TUB


PARTS FROM OLD CAR
We stripped the old car completely down to the TUB as well, and this is required by Porsche for you to get a new TUB. (You have to remove all parts from the tub, have it crushed, have video of the crushing of the old tub, and provide the VIN plate, and you can order a replacement). Here are all the old, reusable parts laid out for organization at the start of the build project.


Engine and transmission (3.8L engine), transmission w the added trans cooler. Stock Cup Cars run w headers that have catalytic convertors.

The 3.8L engine…here you can see differences in the 3.8L Motorsports engine from the 911 GT3 or GT3-RS engine.? The big external difference is the lack of the variable cam timing.

FRONT OF THE CAR
The first step in the build is to install all of the various wiring harnesses….the original Porsche harnesses, not the extra ones that we already have built for ABS and data acquisition….we will add those too.

Windshield wiper, air jack lines, fuel cell, fuel pumps, master cylinders (2) w brake bias adjuster, fuel filter, clutch master, air jack nozzle, electrical cutoff, electric power steering, fuel pressure regulator, fuel reserve system, brake master cylinder brake pressure sensors


INTERIOR – DASH
The wiring and the main dash. The panel on the right is the fuel cell management system (Cantrell). Lights above Motec display are used for a variety of functions besides just being shift lights, and we can program however we like. When the car is set up to not have ABS (this car will have ABS), then we use the lights to designate the progression of wheel lock up so that you can properly modulate pedal pressure….the equation is not so simple though to deal w all speeds and levels of grip which is built into our equation set as well).

Install of the base sequential shifter system and pedals (this car does not have the KMP paddle shift system, but does have the 997.2 auto-blipper (you can tell by the throttle pedal)).

Start of the ECU wiring harness. You can also see that the airjack lines have been run, but the jacks have not been installed in the cabin yet.


This car currently is installed w triple adjustable JRZ racing shocks, and stock Cup springs.? This is the interior rear shock mount for the rear shock resv to make adjustment easily accessible by just opening the doors.? You can also see the custom mount we fab’d for the radio antenna.

Interior complete, including the passenger seat and harness.? We have the passenger seat installed, as we will be instructing this customer for the first couple of tracks days to work on the shifting w the sequential, timing, braking, and power roll-on…anyone who knows these cars, especially w the lighter weight (under 2700 lbs without driver and over 480HP), know that you have to be judicious in the application of the throttle and transitions.? However, we have seen some teams add a rear harness brace, not realizing that the stock Porsche Cup Car has the mounts built into the chassis for the seat beat mounts, including the rear shoulder harnesses.? You can also see both shock resv and mounts now complete, wiring harness all complete, air jack system all complete, fire nozzles (multiple) for engine bay and lines.

FRONT SUBFRAME
Addition of the front subframe after install of the fuel cell, adjustable tubular front sway bar (997.2 bars have dual blades for finer levels of adjustment vs the 997.1 single blade system), and steering rack.? You can see the little items that note that this is a rebuild on a new car….the two underbody fuel cell subframe support rails are different in color…one is from the old car, one is new.

Once the front subframe is in, we can start the addition of all the radiator lines, brake lines, wheel speed harness, front tow hook, transponder. Front fenders are off the car, will be added later.

With the radiator hoses and lines run, we can add the shrouds and radiators (radiator screens will be added later, both front and rear (not rear of the car, but backside of the radiators as well, as we have had rocks go thru the fender liner opening and put a hole in the side radiators, so the fender liners get screens as well)).

Left front corner, now ready to have the suspension elements added. Steering rack was added right after the fuel cell.

Right front headlight bracket (which is part of the radiator support system) and right front radiator assembly (shrouds, ducts, and radiator) added.? We will add screening to both the front and the rear of the radiator opening to prevent rocks or debris from damaging the radiators.


Front suspension (JRZ shocks w stock springs) added and complete.? You can also see that on this car we are running stock Porsche brake pads.? On most of our Club race cars, where pad selection is free, we are currently running Endless brake pads.

Front almost complete.? Wrap complete, screens added, safety catch installed, front window installed.? Now need to add the safety hood pins, tow hook, lights.? Some massaging of the front hood is necessary for proper clearance and adjustment of suspension….if you don’t, you will get some leaking from the brake resv and your alignment will not be optimized.

Here we go….all done on the front.

Graphics added, number panels…she’s ready to dance.

ENGINE BAY
Empty…no rear subframe, no wiring, no fluid lines…

Complete engine and transmission assembly ready to be installed back in the car.? The main wiring harness connection is in, the fire supression nozzles and lines are all installed, the outer rear subframe is now in (the engine cross member to the subframe will complete this).

And….presto, engine and transmission now up and in the car.? Subframe mounted (sides) and rear engine mount (but not the under engine subframe mount), and half shafts have not been connected yet.


Prior to the motor going back in, we had to do some engine repair.? When this car got hit…it damaged the rear water pump housing, rear oil distribution pipe, and cam cover (right side).? Here is a close up of the rear of the engine where those parts have all been replaced.

For many of the “spec” series that Porsche Cup Cars run in, the engine has to be “sealed” by Porsche Motorsport North America (PMNA).? Here is one of the “seals” on the engine.? There are at least four in different locations.

As in any work that is done to a high standard, it is often the little things that you have learned and implemented that ensure future problems will not be created, or show up in track time use.? Here is a pic of where we have seen interference and rubbing from cooling system hoses, and we have added additional padding and protection to ensure these are good for a long time.? This is in the front transmission mount area…we add protection to the mount stud, and wrap one of the cooling lines as well.

If you are wondering, why, on a brand new car, the rear underside of the rear bumper cover has dirt and marks, its because the rear bumper cover we were able to reuse from the first car.

Rear Subframe and Rear Suspension
First step…add the front to rear coolant hard lines, brake lines, trans cables, brake and wheel speed sensors, shock pots wiring.

Add heat shields, add rear subframe outer elements (for suspension), right and left uprights, upper dog bones, lower control arms, toe links, half shafts, center locks

Add the brakes


Add rear shock (JRZ) w stock Porsche springs (main and tender).? The stock spring rate for the main spring is a whopping 1450#.? Cars running in club race or non-spec classes will run softer spring rates, and likely, not symmetrical.

Left rear suspension added.? Here you can also see the adjustable “blade” rear sway bar.? Sway bars are highly adjustable, front and rear, but NOT cockpit adjustable.? The 997.1 only had a blade on one side, the 997.2 (like this) has blades on both sides of each bar.

REAR
We’re showing two elements here….Once we had the car virtually built, we also started w the “wrap” of the car.? We’ll show that later in this www, but you don’t add all the body elements if you are going to do the wrap w a new car, as you want the headlights out, the windows off, the mirrors off, the taillights off.? We’ll even take the wing blade off (we have already wrapped the wing in this picture, and added the “PORSCHE” graphic to the wing blade. But the rear, side, and front windows are not installed yet.

Rear LED taillights installed, rear window installed (if you own a Cup Car, make sure to add additional support to the rear window, or if you spin, the rear window will go flying away)…ask us how we know? :)


She’s ready to go.? The first test weekend went perfect…no issues, no leaks, no troubles, and the setup on the car was amazing.? Woo Hoo!? Such FUN.?? The sound from a Cup Car is so intoxicating!
WRAP of the car.
A wrap can be just for the custom graphics, or for the complete car.? While this design for this car uses a lot of white as its background, we are still going to do the complete car, as the “wrap” also acts like a clear bra in many areas, and by doing it w the wrap, we don’t add additional weight to the car.? Weight in everything we do is the enemy.? If you pay close attention in the photos that follow, you can also see that the white that we used is not the same white as the Porsche Carrera white…as we wanted a white that would “pop” more in the sun.? The complete wrap, along w the car build, was done at the BRracing shop.
The car is now ready to start the wrap process.


To make the wrap work well…you have to deal w all the complex curves and shapes ahead of time.? Here we deal w the ducts.? You can also see how our wrap white is not the same as the Porsche Carrera White.


The complete hood got wrapped in matte black w the gloss black accent.

The design carries over the complete roof as well.


This car uses a fuel cell…so, we wrap over the fuel door, and will NOT cut the door opening.


The car is complete…including all edges, curves, ducts, intake….ready to go.
Thank your for such an informative article !!